
Category Archives: TechTip

Smartblob Primer

One of the more frequent headaches for Informix DBAs is dealing with Smartblobs (BLOB/CLOB). They are powerful storage pieces to handle binary data. However, they have a special set of ways to handle working with them. Unlike other datatypes you can’t just directly store content in them, you have to handle them from files on disk or through the IO system.  

 If you have not worked with them before, they offer some advantages over traditional “Dumb” blobs (BYTE/TEXT). These include the ability to have them logged which allows use in replication. They also can be handled in part rather than reading the entire file at once. You also can easily load them from a file on disk. You are able to keep metadata on them to track things like the last accessed date. One other big advantage is they can store up to 4tb of data. You also can round robin store the data between multiple smartblob spaces. 

To set up the engine you need to create a smartblob space. To do this use the onspaces command with the -c -S flags. By default the space will be unlogged and automatically set up the space inside of the smartblob space to store the metadata. There are some flags you may want to set when creating the space: 

  • -Df buffering=ON  – Use the normal buffer pools rather than a separate memory pool just for smartblobs 
  • -Df ACCESSTIME=ON – Track the last time a smartblob is accessed 
  • -Df LOGGING=ON – Log the smartblob space, this can be changed later on if needed 
  • -Df AVG_LO_SIZE=<size> – Give a general idea of what size the average object will be, this can help storage efficiency  
  • -Ms 150 – The size of metadata, in K, the more objects you have the more metadata space you need, if you run out of metadata space it will block writing to that space 

onspaces -c -S sbspace -p /cooked_space/sbspaces -o 0 -s 1000000 -Ms 10000 -Df “AVG_LO_SIZE=5K,LOGGING=ON,ACCESSTIME=ON” 

Once you have done that, change the $ONCONFIG parameters of SBSPACENAME to define the default smartblob dbs and SBSPACETEMP as the default temp space when dealing with smartblob objects. 
At this point the engine is good to go to start working with smartblob fields. You can create them as normal columns of types BLOB or CLOB. One note is that by default they will go to the SBSPACENAME space, if you want them in another space(s) use the PUT flag.  

CREATE TABLE test_smartblob  ( serial_id serial, blobfield BLOB) PUT blobfield in (sbspace1); 

You can list multiple sbspaces in the PUT command, it will use them round robin.  
Note: as for all Round Robin fragmentation,   if you alter the table to change the PUT location it will not change prior records, it will only use those spaces for new fields 

Now, how to access those fields. There is a main set of functions to handle the fields.  
To load data use the functions FILETOCLOB and FILETOBLOB. You pass them the same way with the parameters of FILETOBLOB(“file_to_load.txt”, “server or client”);  
Where in this case if you define the second field as ‘server’ it will pull the file from the Informix server filesystem and if you set it to ‘client’ it will pull and upload the file from the client system.  

insert into table_a (image_data) values (filetoblob(“/tmp/latest_image.jpg”,’client’)); 

update table_b set latest_log = filetoclob(“/var/log/syslog”, ‘server’) where logname = ‘syslog’; 

To copy a smartblob object to another record use the LOCOPY function. Note that this creates a pointer to a file, not a separate file. 

INSERT INTO students_2026  (photo) SELECT LOCOPY(photo) FROM students:students_2025; 

To retrieve a file you use the LOTOFILE function. This works the same way as FILETOBLOB where you pass LOTOFILE(field_name, “output_file.txt”, “server or client”);  
Note however the output file by default will have a suffix of the internal object. So in this case it would write the file “output_file.txt.30cf2” 

select lotofile(user_image, ‘user_image.png!’, ‘client’) from users_table where user_id = 3; 

select lotofile(latest_tos, ‘/var/www/html/tos.html!’, ‘server’) from web_docs where doc_type = ‘tos’;  

If you want to change the naming scheme you can use ‘?’ in the filename to have it add in hex values to help keep the filename unique. While if you use a ‘!’ in the filename it stops at that point. So setting it to “output_file.txt!” will write out just ‘output_file.txt”  
One of the common headaches with it is there is not a direct way to get the size of a smartblob object. IBM/HCL has you covered here. There is a datablade called ‘excompat’ that adds additional functionality.  
If you need to add it to a database you need to register the datablade: 

execute function sysbldprepare(‘excompat.*’, ‘create’);  

It will add a set of additional functions. A full list can be found at: 
https://help.hcl-software.com/hclinformix/1410/dbxt/ids_dbxt_530.html 

The function that I find most useful is the dbms_lob_getlength function, which works just like you think it would. If you run it with dbms_lob_getlength(column) it gives the size in bytes of the record.  
One note with excompat. Make sure you are running version 1.2. Up to date Informix versions will have this bundled in $INFORMIXDIR/extend/excompat.1.2, if you are running an older version you may want to verify. There is a bug in version 1.1 and 1.0 where smartblob objects > 2gb will return ‘0’ for the length, it may also impact other functions from the extension with files over that size.  
One unofficial trick is if you are running an older version of informix you can get the updated extension from a newer system and it should be backwards compatible, just put it in the $INFORMIXDIR/extend directory.  

Note that Informix only stores a pointer to the smartblob object in the BLOB/CLOB field, not the actual file, which is why everything is stored in smartblob spaces and there is not an in-table storage option like there is with TEXT/BYTE. 

With all of that, smartblobs provide powerful features inside of Informix that add a great deal of flexibility when dealing with binary data. Sometimes it can be a little tricky to get started with them, however they can be a vital part of an advanced Informix environment. 

-Tom Beebe
xDB Systems, Inc
Obtaining a History of Database Size

Mike Walker (mike@xdbsystems.com)

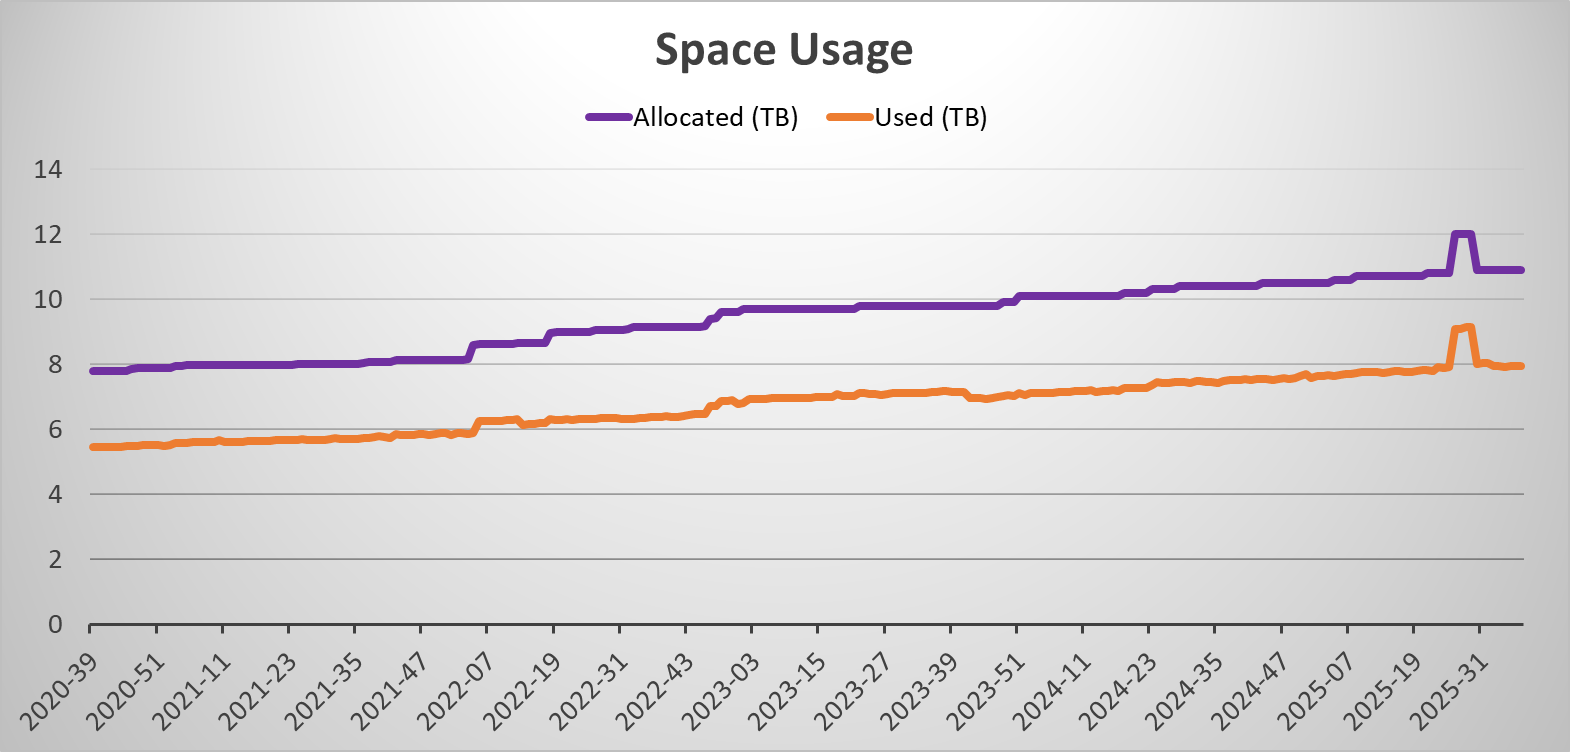
Tracking the space used by your Informix instance over time is valuable to make sure that sufficient disk is provisioned for future growth.
This should be one of several metrics that the DBA should be recording at regular intervals.
But what if you don’t have that history? The sysmaster:sysfeatures table can provide the database size (total allocated and used), each week, for up to 5 years.
Use a query similar to the following to obtain this history:
select
year||"-"||to_char(week, "&&") period,
total_size,
total_size_used
from sysmaster:sysfeatures
order by year, week;

Example:

period           2025-07
total_size       10.6 TB
total_size_used  7.71 TB

period           2025-08
total_size       10.7 TB
total_size_used  7.73 TB

period           2025-09
total_size       10.7 TB
total_size_used  7.75 TB

period           2025-10
total_size       10.7 TB
total_size_used  7.75 TB

Loading this data into a spreadsheet gives the ability to plot how the Informix instance has changed in size.

We can use this same data to answer various questions such as, “how much space has been allocated over the last 12 months?”.
The sysmaster:sysfeatures table has multiple metrics and other information, all of which can be used to show how the instance has changed over time. Among other things, this includes the number of connections, the memory used, and the instance’s role in a cluster. The following is an example showing the most recent record in this table and the information that is recorded:
select first 1 *
from sysmaster:sysfeatures
order by year desc, week desc

week 38
year 2025
version 14.10.FC3
max_cpu_vps 15
max_vps 33
max_conns 298
max_sec_conns 0
max_sds_clones 0
max_rss_clones 0
total_size 10.9 TB
total_size_used 7.95 TB
max_memory 111 GB
max_memory_used 107 GB
is_primary 0
is_secondary 0
is_sds 0
is_rss 0
is_er 0
is_pdq 1

SSL Certificates With 14.10FC10 and Later Changes

In FC10 IBM changed the requirements when using gskit so -type cms no longer works. The engine will come up with it but you will find you get a generic GSK8 error: “cannot initalize GSKit secure socket/GSK_ERROR_SOCKET_CLOSED” with no other information.

To get around this create a new keystore for clients in the .p12 format. Older certificates can be cleanly imported to provide backwards compatibility with older Informix systems already running ssl.

You need to add the -type pkcs12 -pqc false flags for this to work cleanly.

gsk8capicmd_64 -keydb -create -db clikeydb.p12 -pw my_password -type pkcs12 -pqc false -stash
gsk8capicmd_64 -cert -add -db clikeydb.p12 -stashed -file server.cert

Make sure to update $INFORMIXDIR/etc/conssl.cfg to use the .p12 filename rather than .kdb

Tom Beebe (tom@xdbsystems.com)

Setting Up Informix HQ With SSL

As security gets more important, and auditors get stricter about encrypted data we all want to make sure our environments have our data protected as much as possible.
Informix HQ is a great tool to help you manage your Informix environment, it doesn’t take too long to set up and can be incredibly valuable to your organization.

Once you have it set up you may notice that the communication between the HQ server and the agent are unencrypted, so lets change that.

In this example we will have the HQ system set up using the default: monitoring-server.properties and monitoring-agent.properties that can be found from the example files in $INFORMIXDIR/hq

The HQ system is set up with 2 different agents deployed to 2 Informix servers. We are going to reconfigure it to work exclusively over ssl. At this point stop the agents and the server.

Our first step is to use the java keystore tool ‘keytool’ to create a new keystore for us to use. Make sure to save the password you choose. In $INFORMIXDIR/hq run:

keytool -genkey -keyalg RSA -alias selfsigned -keystore hq_keystore.jks

When it prompts for “What is your first and last name?” make sure to put in the hostname of the HQ server. This needs to be the hostname that both the Informix server knows as well as the hostname you will use to connect to from browsers.

Next we need to modify monitoring-server.property file to enable SSL on the webserver, change:

httpsPort=8443  # This can be any secure port you want to use
redirectHTTPtoHTTPS=true
ssl.keystore.file=/opt/informix/hq/hq_keystore.jks
ssl.keystore.password=<password for the keystore above>

Note that some operating systems will not let non-root users start services on ports < 1024.

The log file should contain:

2024-11-29 15:45:25 [main] INFO  c.i.h.s.JettyServer - Serving UI from JAR...
2024-11-29 15:45:26 [main] INFO  c.i.h.s.JettyServer - Configuring server for HTTP on port 8080
2024-11-29 15:45:26 [main] INFO  c.i.h.s.JettyServer - Configuring server for HTTPS on port 8443

At this point if you go back to the url you will see it redirect you to the new https port (8443) and you will get a browser warning about a self signed certificate. This is fine to approve.

Next we need to get our agent to know about the SSL listener. First we need to pull the server certificate from the server keystore:

keytool -export -alias selfsigned -file server_cert.cer -keystore hq_keystore.jks

Next we need to create a new agent keystore, this will import the certificate from above and create a new keystore, give it a unique password

keytool -import -v -trustcacerts -alias selfsigned -file server_cert.cer -keystore agent_certs.jks

In the monitoring-agent.properties file change:

server.port=8443
ssl.enable=true
ssl.keystore.file=/opt/informix/hq/agent_certs.jks
ssl.keystore.password=<password above>

Bring up the agent as normal. You should see it connect and behave as normal, however now it will be communicating over encrypted channels. You can do the same keytool agent creation on any remote systems, or just copy the jks file over to them.

Tom Beebe (tom@xdbsystems.com)
xDB Systems Inc

Smartblob cdr sync Vs cdr check repl

Informix ER has a number of ways to move data in replicates.
I was doing performance testing of transferring smartblob data from an old server to a new one. The target table was empty for this test. It was about 5gb composed of 100K sized smartblob records.

Logging Modecdr synccdr check repl
Logging Off5:349:30
Logging OnLogical Log Rollback (DNF)9:54

Obviously having smartblob logging on for important data is the preferred way to do it. You *can* lose data with an engine crash if smartblob logging is off, even if the table itself is logged. However for copies, the fastest way may be with it disabled.

Remove Newlines From an Informix Unload File

Informix character fields can contain special characters and even newlines. This allows for formatted data, e.g. a list spanning multiple lines within a single field. A newline is also an end of record character when a table is unloaded to a file, e.g. with the UNLOAD command, a dbexport, or optionally in an external table. To distinguish a literal newline character in the unload file, Informix escapes the newline with a backslash (“\”) to indicate that the next character does not have any special meaning. Note that the escape character can be changed by setting DEFAULTESCCHAR in the Informix configuration file ($ONCONFIG), or as a session environment variable.

When a file is loaded into a table with Informix, the escape character itself is not inserted into the table but instead directs the load to insert the following newline as a literal newline and to not treat it as the end of the record.

When loading such a file into a non-Informix database, the special significance of an escape character is not supported, and instead the loading utility will attempt to load the escape character itself and will then treat the embedded newline as the end of the record. This will usually result in an error because the record will have too few fields. Loading into Oracle for example may show as:

ORA-01722: invalid number

The usual solution for this condition is to convert the unload file and strip out the 2-character combination of backslash + newline. Most Unix utilities will also treat newlines as an end of record characters so you cannot just use a simple “search and replace” regular expression to identify and remove these combinations. There are several ways to tackle the problem, but I use the “sed” command with the “N” operator to pull up the following line when a line ends in a backslash, then remove the backslash + newline and replace it with a “space”. I choose to substitute a space for the newline to preserve readability in cases where the field may have contained a list.

The following is an example of a script that will perform this conversion. It also:

  • Strips return characters from the unload file
  • Replaces literal “\” characters, shown as “\\” in the unload file with a single backslash

The script assumes that the default character of “\” is used to escape newlines in the file.

INFILE=$1

if [[ ! -s "${INFILE}" ]]
then
   echo "File $INFILE does not exist or is empty"
   exit 1
fi

cat ${INFILE} | tr -d "\015" | sed '
:loopy
/\\$/{
N
s/\\\n/ /g
/\\$/b loopy
};
s/\\\\/\\/g
'


Input file (tstfile):

AAA|BBB|CCC|
DDD\
D\
DDD|EE\
EE|F\
F|
GGG|HHH|I\
II\
I|
JJJ|KKK|LLL|
MMM|List #1 - 1\\2 a thing\
List #2\
List #3|NNN|


Results:

./remove_nl.sh tstfile

AAA|BBB|CCC|
DDD D DDD|EE EE|F F|
GGG|HHH|I II I|
JJJ|KKK|LLL|
MMM|List #1 - 1\2 a thing List #2 List #3|NNN|

Mike Walker (mike@xdbsystems.com)
IBM Data Champion

Using Informix SSL With External CA and OpenSSL

Informix SSL is an important piece of your security setup when running a relational database.
The Informix server is still set up to use GSKit from IBM to handle the internal server keystore. Clients are free to use openssl. In this article we are going to cover step by step how to set up SSL using a key generated from an external certificate authority (CA) rather than doing self-signed ones generated by the local server. All of the examples here are assuming a 64bit Linux system. Windows will use the same method and 32bit systems will have a different gsk8capicmd tool.

Settings for this example:

INFORMIXSERVER=informix4
INFORMIXDIR=/opt/informix
Primary listener: informix4  onsoctcp 9088
SSL Listener: informix4_ssl onsocssl 9089
SSL_KEYSTORE_LABEL: test_ssl_label
Keystore Password: my_password

The first step is to go to $INFORMIXDIR/ssl and create your empty keystore using GSKit. Note that it has to be named the same as the DBSERVERNAME

gsk8capicmd_64 -keydb -create -db informix4.kdb -pw my_password -type cms -stash

Next use GSKit to generate a CSR (certificate request file)

gsk8capicmd_64 -certreq -create -db informix4.kdb -stashed -label test_ssl_label -dn "CN=xdbsystems.com" -size 2048 -sigalg SHA256_WITH_RSA -target informix4.csr


Use that file to request a new public/private keypair from your CA. Different systems will handle this differently so talk to your security administrators.

Next Add the management chain certificates to the keystore

gsk8capicmd_64 -cert -add -db informix4.kdb -pw my_password -file ManagementCA-chain.pem

Next import the new server certificate you received from the certificate request

gsk8capicmd_64 -cert -receive -db informix4.kdb -stashed -file informix4.pem

Validate the keys are there

gsk8capicmd_64 -cert -list -db informix4.kdb -stashed
Certificates found
* default, - personal, ! trusted, # secret key
!       "O=EJBCA Container Quickstart,CN=ManagementCA,UID=c-0fno0f82c4y4p6umb"
-       test_ssl_label

Bring the engine up, you should see the following

Forking 1 'soctcp' listener threads...succeeded
Forking 1 'socssl' listener threads...succeeded

Next set up a client, on the client system create a keystore, make sure clientsdk is installed with the option to use openssl. This creates the keystore and loads in the root CA chain

openssl pkcs12 -export -nokeys -in /opt/informix/ssl/ManagementCA-chain.pem -caname "O=EJBCA Container Quickstart,CN=ManagementCA,UID=c-0fno0f82c4y4p6umb"  -passout pass:my_password -out client1.p12

Create the stash file

onkstash client1.p12 my_password

Set up the client to have conssl.cfg in $INFORMIXDIR/etc:

SSL_KEYSTORE_FILE  /opt/informixcsdk/ssl/client1.p12
SSL_KEYSTORE_STH /opt/informix/ssl/client1.sth

Now you can validate that the client only needs the CA information to validate the certificates, note there is no Informix server specific key, just the CA chain.

openssl pkcs12 -nokeys -info -in client1.p12 -passin pass:my_password
MAC: sha256, Iteration 2048
MAC length: 32, salt length: 8
PKCS7 Encrypted data: PBES2, PBKDF2, AES-256-CBC, Iteration 2048, PRF hmacWithSHA256
Certificate bag
Bag Attributes
    friendlyName: O=EJBCA Container Quickstart,CN=ManagementCA,UID=c-0fno0f82c4y4p6umb
subject=UID = c-0fno0f82c4y4p6umb, CN = ManagementCA, O = EJBCA Container Quickstart
issuer=UID = c-0fno0f82c4y4p6umb, CN = ManagementCA, O = EJBCA Container Quickstart
-----BEGIN CERTIFICATE-----
MIIEszCCAxugAwIBAgIUZ3v7iIk5DxAxtF8jMELOef9Lp3cwDQYJKoZIhvcNAQEL
BQAwYTEjMCEGCgmSJomT8ixkAQEME2MtMGZubzBmODJjNHk0cDZ1bWIxFTATBgNV
BAMMDE1hbmFnZW1lbnRDQTEjMCEGA1UECgwaRUpCQ0EgQ29udGFpbmVyIFF1aWNr
c3RhcnQwHhcNMjQwOTEwMjEwNDE4WhcNMzQwOTEwMjEwNDE3WjBhMSMwIQYKCZIm
iZPyLGQBAQwTYy0wZm5vMGY4MmM0eTRwNnVtYjEVMBMGA1UEAwwMTWFuYWdlbWVu
dENBMSMwIQYDVQQKDBpFSkJDQSBDb250YWluZXIgUXVpY2tzdGFydDCCAaIwDQYJ
KoZIhvcNAQEBBQADggGPADCCAYoCggGBAJv+MpjjAHh5msYkw8KwSJ5HSW79jofS
Mt9ruk7A85Ac+xFEA3IM9i1T9PISdwWzopCz/d1T3JYEpngKyUex9DANOLoKqTyp
XDm6Yyj6YH0vxNLEroQJBpvw6SCHKBO6EjZkAAecCOnYmT95QPdF2w5u5Kk1X7yg
VV59HIYxVd3xZVW2llrHH+u4pIeNruSotvRalpEddXdve1Ym0uoexRc5q4z44wwz
0uWwOaQZv7vGmTkfNT6nUqCqw/M6STJpyadNVMEyUeXHfuNNQbJ6UqyWAKH4fFGZ
V6jjKMENEC2f5I8BR5xB1hjWbVsOHuGCKLeRuP0Hq14B3JCaUFK7CLtpXVlLEWJ1
3Cm2SbNWUmVveEMXEN6L8BVwGdyyFtM2AsP/RNcKWSMiInGe39Hr4XpVN1tPqHCm
gh8ug/7v3n96aC2138oIjcrWVtGdAuo4Cb9N9/cOBnnyOp/Yof4Hlru9wyTSxMTo
yDQToNw6xk3/w5ueJDkAlMQD715lknEp8QIDAQABo2MwYTAPBgNVHRMBAf8EBTAD
AQH/MB8GA1UdIwQYMBaAFG4HtnbBN31dyfzLpmqyLgveCnl+MB0GA1UdDgQWBBRu
B7Z2wTd9Xcn8y6Zqsi4L3gp5fjAOBgNVHQ8BAf8EBAMCAYYwDQYJKoZIhvcNAQEL
BQADggGBACHAeek2OHKhrHW80t0hWWa83sXNFbKFc1hxb5H9GcT4UueTeKirfy+U
mW3sY5L5MzFTVUoqHpdg7mYH7GGszyUZPnZL6iCZJwZs4QDraDl1cuxHa4JQRQtV
LLMDVGL40Qc2p3bhkw3HOcJHD4wDVg4bazoLizyrsMk1rKNWvjQnHI7Ci/AcN7r0
8Yt8OWQjYdlSHLKBj0H03vZXPGzlr5j+aJGEXorGRHXkiMEntaUM2XZeyL5y1uSo
NnegwX7WvrT/LFx7EYN3LCNbnlph7BCoeF8TNdPVFOIFx/zxJDiIdYuB7nop3ZHN
SABgCxVKTzetHlt//DC/NIa5pfVXwRTKFuMvqjk/Zri4bXGjf/GaS9hRqLI43KoF
Urq3oLtIJPTbF8AxgFXxEaa863nNAta8yEO05ulDrQF9uGiGKjenTlsTY+bor8nr
FM/jwVNwGTFaddsWPcVNak5ayMQioSNn2/GWE52LyWhNaIBAZy05/5VrAJTnVWZL
whKy/ea4hQ==
-----END CERTIFICATE-----

Note with the Informix CSDK. As of newer Linux versions, the older libssl.1.1 it expects is no longer available. You may need to install a libssl compat library to get the libraries needed. You may also need to symlink $INFORMIXDIR/lib/libisi_o11.so.3.0 to $INFORMIXDIR/lib/libisi.so.3 if it returns an error that the file is missing. Hopefully this will be corrected in the next edition of Informix to support the newer openssl libraries that are standard.

Thomas Beebe
tom@xdbsystems.com
IBM Data Champion

Installing Informix 14.10FC11 on Ubuntu 22.04

Each version of Informix has its own specifics for what is required. Below are the steps needed for the operating system to get Informix 14.10FC11 to work correctly.

Create the informix group and user:

groupadd informix
useradd -g informix -m informix

Install Packages: (Note that rpm is required for the current gskit install, deb files are missing)

apt-get install ksh libaio-dev libncurses5 default-jre rpm 

Install Informix as normal, assuming /opt/informix is the target location

Set up global settings in /etc/informix.conf:

INFORMIXDIR=/opt/informix
INFORMIXSERVER=ids_system_tcp
ONCONFIG=onconfig.ids_system_tcp
PATH=/bin:/usr/bin:/usr/local/bin:/sbin:/usr/sbin:/opt/informix/bin

Set up global libraries (getting away from LD_LIBRARY_PATH)

/etc/ld.so.conf.d/informix.conf:
/opt/informix/lib
/opt/informix/lib/cli
/opt/informix/lib/esql

Run: ldconfig

Edit /home/informix/.profile add:

. /etc/informix.conf
export INFORMIXDIR INFORMIXSERVER ONCONFIG PATH

Set up Informix config as normal and initialize the engine. Once it is fully initialized and sys* databases are created, bring it back offline.

Next, set up Informix to be controlled by systemd:

/etc/systemd/system/informix.service:
[Unit]
Description=Informix server
Wants=basic.target
After=basic.target network.target

[Service]
Type=forking
User=informix
EnvironmentFile=/etc/informix.conf
ExecStart=/opt/informix/bin/oninit
ExecStop=/opt/informix/bin/onmode -kuy
TimeoutStartSec=1000
TimeoutStopSec=1000

[Install]
WantedBy=multi-user.target

Set up auto start/stop:

systemctl daemon-reload
systemctl enable informix
systemctl start informix

At this point you should be ready to go to start working with Informix.

By: Thomas Beebe (xDB Systems, Inc) tom@xdbsystems.com. IBM Champion.

How To Download Informix

This may be a simple seeming task but when pointing someone unfamiliar with how IBM handles software to the site there is often confusion. Hopefully this article may be helpful for people who have not had to get the software before.

If you are downloading the free versions, including the Client SDK, use the link at the top “Informix Information > Informix Downloads” which will take you to the IBM download site. You will need a free IBM ID to proceed.
If you are coming to download a licensed version, sign in to the passport advantage site with login credentials that are authorized to access the software you need.

Either way once you get to the software download section you will see a lot of options for different versions of Informix and tools.

You will see a naming convention for each download. For the server you will see it start with a 12 or a 14 (eventually a 15 as well) which is the primary version of Informix.
Next is the subversion of ‘.10’. Right now all current versions of informix are .10. This may change in the future.
The next is a letter, above it is all ‘F’. This is FC – 64bit, UC- 32bit, TC – 32bit Windows
Then it is the release information. In this case most of them are XC11 for v14, and XC12 for version 12. New releases will mostly be increases in the subrelease number. These tend to come out every few months.
The drivers (CSDK, JDBC) are going to be a slightly different numbering system. With 4.50 = V14, V4.10 = V12, V3X for Version 11 releases, etc.

The different pieces of software you may see:

  • IBM Informix Developer Edition – This is the server install package. With V14 all installs will be the developer edition until a license file is applied
  • Informix Enterprise Time Limited Edition – This is a full server install with all of the features that will only be usable for a limited time before it stops working. This is used to evaluate and test enterprise features before purchasing it
  • Informix JDBC drive is the standalone JDBC Driver
  • IBM Informix CSDK is the client SDK which contains all of the different drivers as well as the SDK to compile against. Included in this is some basic utilities including ‘dbaccess’ Version 12 has this bundled with the server, V14 has the engine not include the CSDK so you need to install it as well
  • Informix <Version> Edition Installer – This is the license file that needs to be installed with the engine to change the V14 developer edition into that full featured version. The public site only has the “Innovator-C” edition of this, but in passport advantage it should have all of the ones you are entitled to. Note that this file should be 10-15MB in size.

So when you go to download, get the latest release number for the operating system and CPU architecture that you need. If you are running Linux you probably want to get “Linux x86 64” versions.

Once you download the file and extract it you will see another .tar file in the directory, this is a little odd but there is a reason for it

root@alpaca:/home/tom/Downloads/Informix14/FC11# ls
ibm.csdk.4.50.FC11.LNX.tar
root@alpaca:/home/tom/Downloads/Informix14/FC11# tar -xpf ibm.csdk.4.50.FC11.LNX.tar 
root@alpaca:/home/tom/Downloads/Informix14/FC11# ls
ibm.csdk.4.50.FC11.LNX.tar  ibm.csdk.4.50.FC11.LNX.tar.cosign.sig  informix.pem  README.codesign

The file ibm.csdk.4.50.FC11.LNX.tar is actually a new file, just of the same name. You can use the sig files included to validate that the files are genuine and have not been tampered with. Read README.codesign for information on how to do that.

If you untar the new .tar file you will see the contents you are expecting:

root@alpaca:/home/xilet/Downloads/Informix14/FC11/t# tar -xvf ibm.csdk.4.50.FC11.LNX.tar
installclientsdk
doc/
doc/csdk_lux_relnotes.html
doc/csdk_win_relnotes.html
doc/Gls_relnotes_4.50.html
doc/Glsapi_machine_notes_4.50.txt
doc/ESQLC_machine_notes_4.50.txt
doc/Odbc_machine_notes_4.50.txt
doc/Libcpp_machine_notes_4.50.txt
csdk.properties
README_csdk.txt

Then just run the installclientsdk as normal.

Often it is asked why the Informix drivers are not included with Linux distributions repos. Informix includes encryption pieces that have limitations from the US gov on being exported to specific countries.

Thomas Beebe (tom@xdbsystems.com)
IBM Data Champion

Tech Tip – CSDK Install 4.50FC10 on Win11

Some users may find that when installing 4.50FC10 on Windows 11 the installer crashes with:

Flexeraaw7$aaa: Windows DLL failed to load
at Flexeraaw7.af(Unknown Source)
at Flexeraaw7.aa(Unknown Source)
at com.zerog.ia.installer.LifeCycleManager.init(Unknown Source)
at com.zerog.ia.installer.LifeCycleManager.executeApplication(Unknown Source)
at com.zerog.ia.installer.Main.main(Unknown Source)
at sun.reflect.NativeMethodAccessorImpl.invoke0(Native Method)
at sun.reflect.NativeMethodAccessorImpl.invoke(NativeMethodAccessorImpl.java:90)
at sun.reflect.DelegatingMethodAccessorImpl.invoke(DelegatingMethodAccessorImpl.java:55)
at java.lang.reflect.Method.invoke(Method.java:508)
at com.zerog.lax.LAX.launch(Unknown Source)
at com.zerog.lax.LAX.main(Unknown Source)

To solve this issue, open a windows command window and

set JAVA_TOOL_OPTIONS="-Dos.name=Windows 7"
installclientsdk.exe